Outlook Plugin User’s Guide
Microsoft® Outlook® Plug-in For SDE User’s Guide
Contents
- About This Guide
- Prerequisites
- Terminology
- Understanding Security Levels
- Sending a Secure Email
- Transferring Large Size Files
- Understanding Safe-Reply
- Configuring Connection Settings
- Safe-T New Email Send Options
- Package Receipt
Document Information
This document is for informational purposes only. Safe-T Data makes no warranties, express or implied, in this document. Safe-T Data is a registered trademark of the Safe-T Data Corp. in the United States and/or other countries. The names of other companies and products mentioned herein may be the trademarks of their respective owners.
The information contained in this document, or any addendum or revision thereof is proprietary of Safe-T Data A.R., Ltd. and is subject to all relevant copyright, patent and other laws and treaties protecting intellectual property, as well as any specific agreement protecting Safe-T Data A.R., Ltd. rights in the aforesaid information. Any use of this document or the information contained herein for any purposes other than those for which it was disclosed is strictly forbidden.
Safe-T Data A.R., Ltd. reserves the right, without prior notice or liability, to make changes in equipment design or specifications. All specifications are subject to change without prior notice. Safe-T Data A.R., Ltd. assumes no responsibility for the use thereof nor for the rights of third parties, which may be affected in any way by the use thereof.
This document may contain flaws, omissions or typesetting errors; no warranty is granted nor liability assumed in relation thereto unless specifically undertaken in Safe-T Data A.R., Ltd.’s sales contract or order confirmation. Information contained herein is periodically updated and changes will be incorporated into subsequent editions. If you have encountered an error, please notify Safe-T Data A.R., Ltd.
About This Guide
This user’s guide describes how to use the Microsoft® Outlook® Plug-in for Safe-T Secure Data Exchange server (SDE) version 7.1.0.
The Outlook Plug-in enables you to work with the familiar Outlook email client while taking advantage of many additional features such as:
- Enhanced security for emails and file/folder attachments
- The ability to send files and folders of any size
- The ability to manage data you store in Safe Spaces
This guide assumes you already are familiar with how to send and receive emails and other basic features of the Microsoft Outlook email client.
Prerequisites
In order to use the plug-in, you need to obtain access to Microsoft Outlook with the Safe-T Outlook Plug-in application installed. You must also configure the connection details that enable the Outlook plug-in to communicate with the Safe-T SDE server.
Note: Your company’s system administrator will usually install and configure the Outlook Plug-in.
Terminology
This table describes terms that are used in this guide. You should be familiar with them before continuing.

Overview of the Safe-T SDE Outlook Plug-in Interface
This section provides a high-level overview describing how you can access the Secure Transport features within the Outlook Plug-in interface.
Starting in your Outlook email client, select the Home tab > New Email > Secure Transport tab. A new message window appears displaying the Outlook Plug-in icons.

Outlook Plug-in Interface Components
This table describes the main Outlook Plug-in components available to you in the Plug-in ribbon. Subsequent sections in this guide explain each of the features in greater detail.

Note: You can attach files and folders using either Insert File/Folder or SmarTransfer in each email you send but not both. To send file attachments from your local computer and from Safe Spaces you need to send separate emails.
Understanding Security Levels
The Outlook Plug-in provides three security levels you can choose from: High, Normal, and Low. You select a security level each time you send an email.
Tip: Your system administrator may enforce using a particular security level, for example High, by disabling (greying out) a security option.
The following tables describe the available email security levels:

Select the High security level to encrypt both your email message and file/folder attachments. For example, if you send someone an email detailing your company’s business plans for the next quarter and include charts in an attached PPT presentation you should encrypt both the email message and attachment.
Info: The High security level encrypts both the email message and file/folder attachments in an Outlook Safe Space on the Safe-T SDE server. When a recipient logs in to download them, they are decrypted and streamed over a secure protocol to the recipient.
Normal: Similar to the High security level except the file/folder attachments are encrypted but the email message is not. Recipients are required to authenticate using an OTP verification code before accessing the file/folder attachments.
Note: Registered recipients log in using their own login credentials instead of the OTP verification code.
The Normal security level encrypts your file/folder attachments. For example, if you send a business partner a PDF file containing an order form the email message itself might not require encryption though the file/folder attachments should be.
Low: The file/folder attachments are made available to your email recipients by sending them a link to download the files securely from the Safe-T SDE server. Using Low security, recipients do not have to authenticate.
Sending a Secure Email
This section describes the essential steps to send secure emails with attachments.
To send a secure email:
- New Email > Secure Transport tab > Secure Transport(On). The Outlook Plug-in toolbar interface appears.
- Select the email security level you want: High, Normal, or Low.
- Fill out the To, Subject, and your message.
-
Insert a file attachment using either Insert File/Folder or SmarTransfer.
The Insert File/Folder button provides the same functionality as the Outlook Message > Attach file paper clip icon in Outlook. Click the button and browse on your local computer for files you want to attach.
The SmarTransfer button enables you to attach files that are stored in your Safe Spaces. Click the button and browse in your Safe Spaces for files you want to attach as links.
Note: 1. If you right-click a file, the context menu includes a link: “Safe-T Secure Transport”. Click the link and the file you selected is loaded into the new email window as an attachment. You can insert file/folder attachments using either Insert/File Folder or SmarTransfer but in a given email you can use only one of the methods.
- To send file attachments from your local computer and from Safe Spaces, you need to send the file attachments in separate emails.
Receiving A Secure Email
This section describes how to receive a secure email and attachments. The method is different depending on the level of security chosen by the email sender.
Receiving A High Security Email
When a user sends a high security email, both the message and attachments are encrypted.
The recipient receives an email with an empty message area (some boilerplate text) and a link to download secure content. In a separate email, or in an SMS, the recipient is provided with an OTP verification code. Registered users log in with their own login credentials.
Info: The recipient cannot view the sender’s message in the email. The sender’s email message and file/folder attachments are stored securely on the Safe-T SDE server.
Figure 5: Recipient Receives High Security Level Email

In a second email, or by SMS, the recipient gets an OTP verification code. A typical verification code consists of 4 digits (e.g. 8240).
The recipient now can click the Secure Content link to display a Safe-T SDE Secure content download web page. The web page is for user authentication and looks similar to this:
Figure 6: Recipient Logs In By Entering OTP

The recipient enters a verification code and clicks Submit.
If the verification code is correct, a web page displays the following information:
• A decrypted message now viewable by the recipient.
• A link enabling the recipient to download the encrypted file attachment.
Figure 7: Decrypted High Security Message

Tip: The file attachment is stored securely on the Safe-T SDE server. When the recipient authenticates using the verification code, the file can be downloaded. File or zipped folder attachments are always downloaded from the Safe-T SDE server using a secure communications protocol.
When the recipient downloads a file attachment, the sender receives an email report update noting that the email recipient downloaded a file attachment you sent. For more information, see the section describing the Package Receipt.
Figure 8: Sender Receives a Delivery Receipt

Receiving A Normal Security Email
When a user sends an email using the Normal security level, the attachments are encrypted however the message is not.
In this example, a sender who submitted to the accounting department a travel expenses report did not think the message needed to be sent securely though the attached XLS file is encrypted.
Figure 9: Recipient Receives Normal Security Email

The recipient, in this example the company accounting department, receives an email with the sender’s message visible and a link for downloading Secure Content. In a separate email, or in an SMS, the recipient is provided with an OTP verification code. A typical verification code consists of 4 digits (e.g. 9243).
Info: The recipient views the sender’s message as plain visible text. However, the file/folder attachments are stored securely on the Safe-T SDE server.
The recipient clicks the Secure Content link to display a secure content download web page. The web page is for user authentication and will look similar to this:
Figure 10: Recipient Enters OTP Verification code
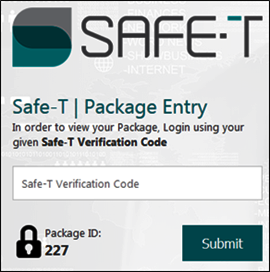
The recipient enters the verification code and clicks Submit.
If the verification code is correct, a web page appears with a link that enables the recipient to download the encrypted file attachment.
Figure 11: Download Normal Security Attachments
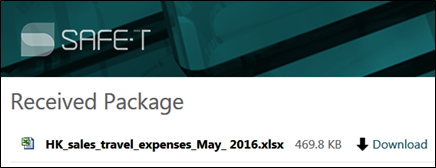
Tip: The file attachment is stored securely on the Safe-T SDE server. When the recipient authenticates using the verification code the file can be downloaded. The file/folder attachments are always downloaded from the Safe-T SDE server using a secure communication protocol.
When the recipient downloads a file attachment, the sender receives an email update report noting the recipient downloaded a file attachment you sent.
Figure 12: Sender Receives a Delivery Receipt

Receiving A Low Level Security Email
When a user sends an email using the Low security level, the file/folder attachments are sent to email recipients with a link to download them securely from the Safe-T SDE server. Using Low security, recipients do not have to authenticate.
Figure 13: Recipient Receives a Low Security Email

In this example, the sender did not consider the lunch invitation or the enclosed map to the Waffle House confidential enough to send using a higher level of security.
However, email attachments sent using the Low security level are downloaded from the Safe-T SDE server using a secure HTTPS network link.
Transferring Large Size Files
An advantage of using Safe-T SDE, in addition to enabling secure data storage and transfer, is the capability to send files of any size, for instance 5GB. If upload or download times become lengthy you can send large files from a dedicated client computer or send the files overnight.
Tip: If you do not want to encrypt large files, you can send them using the Low security level. Info: Microsoft Outlook blocks sending or receiving attachments that exceed 20 MB and often company system administrators set a limit of 10 MB. Using Safe-T SDE, you can easily send them.
Understanding Safe-Reply
The Safe-Reply invitation allows your email recipient to respond securely to you in an email with secure attachments.
Tip: Individuals outside your organization do not have a Safe-T SDE account or any additional software installed. They can send you safe email replies securely that include large file/folder attachments.
Figure 14: Send a Safe-Reply Invitation

To send a Safe-Reply invitation: In a new email > Secure Transport On > click the Safe-Reply checkbox > set the security level to either Normal or High.
The email recipient receives a verification code and a separate email that looks similar to this:
Figure 15: Recipient Receives a Delivery Receipt

Secure Content link: Access the sender’s message (if the security level=High) and attachments. You need to enter your verification code in an authentication web page.
Accept Invitation link: Access a web page that enables you to reply one time securely to the sender with a message and attachments. You need to enter your verification code in an authentication web page.
Figure 16: Recipient Can Send a Safe Reply

The recipient writes a message > adds file attachments > clicks Next.
A confirm details window appears. Click Next.
Figure 17: Recipient Can Add File Attachments To The Safe Reply
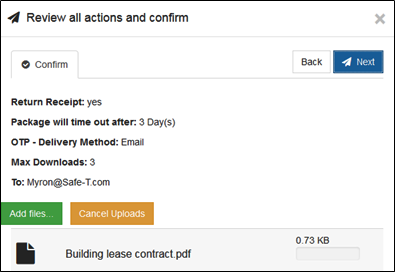
The Safe-Reply is sent and a message appears: “Action completed successfully”.
The original sender receives an email with a Secure Content link. Clicking the link opens a Safe-T web download page into which the sender enters a verification code or is allowed to log in as a registered user.
Configuring Connection Settings
This section describes how to configure the connection details that enable the Outlook plug-in to communicate with the Safe-T SDE server.
Note: Your company’s system administrator will usually install and configure the Outlook Plug-in.
To open the connection settings window
- In the Outlook client ribbon, click the Add-ins tab.
- Click the Safe-T button, then click Settings. A Settings window appears.
- Click the Connection tab if it is not already selected.
Figure 18: Global Settings Connection Tab

Enter values for these fields. Note that in general the connection details to the Safe-T SDE server are configured by your system administrator.
• User name: The Safe-T SDE server account user name.
• Password: The Safe-T SDE server account password.
• RemoteUFID: Identifier used to connect the Outlook Plug-in with a specific Safe Space in the Safe-T SDE server.
• Server Name or IP address: Safe-T SDE server network address.
• Test Settings: Click to verify you have a connection to the Safe-T SDE server. If you are connected a message appears: “Success. You have a valid connection”.
If you change any connection details, click OK.
Configuring Global Send Options Parameters
Global features refer to parameters you can set as default values for all emails. They are applied whenever you send an email. However, these are exceptions:
• Your system administrator can enforce all configuration parameters. When this occurs, the option you see is disabled (i.e. greyed out).
• You can override global Send Option settings on an individual basis when you open a new email window.
Note: This section describes only the most important configuration parameters.
Safe-T Global Settings
You can automate when to send emails using the Plug-in Secure Transfer feature by setting a rule on how Safe-T SDE handles file attachments.
When you send an email as an ordinary Outlook user without setting Secure Transport On, if your email and attachments meet the condition you set with this feature, Secure Transport will be automatically set to On.
To set a file attachments rule:
- In the Outlook Plug-in client, click Add-ins > Safe-T > Settings > Settings tab.
Figure 19: Global Settings Tab
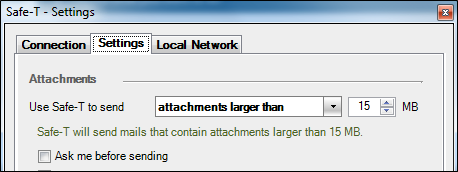
- In Use Safe-T to send, select one of these options:
• All attachments: If your Outlook email contains a file attachment, Secure Transport will be turned on.
• Attachments larger than: If your Outlook email contains a file attachment that is larger in size than a number you set (e.g. 15 MB), Secure Transport will be turned on.
Info:Microsoft Outlook blocks sending or receiving attachments that exceed 20 MB and often company system administrators set a limit of 10 MB. For more information, see Transferring Large Size Files.
• Attachments on demand: Your Outlook email will be sent with Secure Transport Off, unless you click the Secure Transport tab and Secure Transport On.
• All messages: Your Outlook email will be sent with Secure Transport whether you are sending a message with or without any file attachments.
• Ask me before sending: If you select this option, when you click Send a prompt will display asking you if you want to send the email and attachments using either High, Normal, or Low security.
- When you are done making changes, click OK.
Safe-T Global Send Options
Global Send Options refer to parameters you can set as default values for all emails. They are applied whenever you send an email. However, these are exceptions: • Your system administrator can enforce all configuration parameters. When this occurs, the option you see is disabled (i.e. greyed out).
• You can override global Send Option settings on an individual basis when you open a new email window.
Note: This section describes only the most important configuration parameters.
Setting Package Delivery Parameters
To Configure Send Options (Package Delivery Settings tab): In the Outlook Plug-in client, click Add-ins > Safe-T > Send Options > Package Delivery Settings tab.
Figure 20: Global Send Options Package Delivery Tab
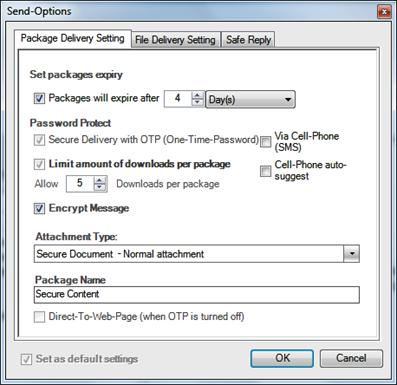
You can optionally configure these parameters:
• Package will expire after: Set the duration in days after which your recipients cannot access your package using the Secure Content link in the email you send.
• Secure Deliver with OTP (One-Time Password): If you select the checkbox, your recipients will need to authenticate using a verification code that is sent to them either in a separate email, or by SMS. Note: Registered recipients log in using their own login credentials.
• Via Cell-Phone (SMS): If you select the checkbox, your recipients will receive an OTP verification code via SMS. By default, recipients are sent a verification code in a separate email.
• Cell-Phone auto-suggest: When you send an email a prompt appears: “Enter recipient’s mobile number”. The prompt includes a link enabling you to browse the Microsoft Exchange Address Book for the recipient’s mobile phone number.
• Encrypt Message: If you select the checkbox, the security level is set to High.
• Attachment Type: Select how email recipients access attachments sent to them:
o Secure HTML: Enclosed in the email there’s an HTML file. If you click, it a link appears “Click here to proceed…” that displays the web download page.
o Secure URL Link: Embedded on top of the E-Mail Message Body (default):Displays the web download page.
o Secure Document: Normal attachment: Displays the web download page.
• Limit amount of downloads per package: Sets the limit on the number of times an email recipient can download file attachments from the secure content download web page.
• Package name: Set the display text of the link email recipients can click on to download secure messages and file attachments. By default the link is: Secure Content.
When you are done making changes, click OK.
Setting File Delivery Parameters
To Configure Send Options (File Delivery Settings tab):
In the Outlook Plug-in client, click Add-ins > Safe-T > Send Options > File Delivery Settings tab.
Figure 21: Global Send Options File Delivery Tab
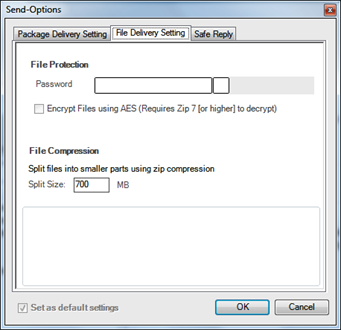
You can optionally configure these parameters:
• File Protection password: If you enter a password, the file attachments you send will be encrypted. Your recipient needs to know the password you set in order to decrypt the files attachments you send.
Tip: If you send file attachments with High or Normal security, your email recipient must enter an OTP verification code and after file download must enter a separate password you optionally set using the file protection password feature.
• Encrypt file using AES: If you select the checkbox, along with setting a file protection password, your files are encrypted with a strong encryption algorithm.
• Split files into smaller parts using zip compression: If you send a large file attachment greater than the split size in MB, your file attachment is split into smaller zip files. By default, files are split if they are larger than 700MB.
Setting File Safe Reply Parameters
To Configure Send Options (Safe Reply tab):
In the Outlook Plug-in client, click Add-ins > Safe-T > Send Options > Safe Reply tab.
Figure 22: Global Send Options Safe Reply Tab

You can optionally configure these global send parameters:
• Invite recipients to a Safe Reply: If you select the checkbox, your email recipient can respond securely to you in an email with secure attachments.
• Invitation will expire after: Set a duration in days after which the recipient cannot send you a Safe Reply.
• Return Safe Receipt for Delivery: If you select the checkbox, when the email recipient downloads a sent package from the Secure Content download web page, you will receive an email receipt with package details (e.g. ID, Date, Expiry Date, Max Downloads: # Package Read: Auth Method).
• Distribution Job: Enables you to set the email sender’s name and email address to an arbitrary value. For example, you may want to send a bulk mailing using a company name instead of your own personal email name and address.
Safe-T New Email Send Options
New Email Send Options refer to parameters you can set when you open a new email window. The settings apply only to the new email you are sending.
• You can override the global Send Option settings on an individual basis for the new email.
• Your system administrator can enforce all configuration parameters. When this occurs, the option you see is disabled (i.e. greyed out).
Note: The Global and New Email Send Option parameters are the same. The difference is the global settings are the default settings, and the changes you make in the new Email Send Options dialog box override the global default values only for the individual new email you are sending.
For example, if you set a Global Send Option to limit the number of downloads for a secure package to 5 times, you can change that setting for an individual email to a value of 3 downloads.
To open the new email Send Options window, do the following:
Outlook > Home > New Email > Secure Transport > Send Options.
Figure 23: New Email Send Options

Using SmarTransfer
SmarTransfer enables you to view, manage, and send files that are stored in your Safe Spaces.
A Safe Space is a folder hosted on the Safe-T SDE server. You can upload/download files from a Safe Space, and you can insert files from a Safe Space into an email as an attachment. For more information, see Basic Terminology.
You can access SmarTransfer in the Outlook Plug-in two ways:
• Outlook New Email Window.
• Outlook client navigation pane.
Accessing SmarTransfer From the New Email Window
To access the SmarTransfer window using the SmarTransfer button open a new email > Secure Transport tab > click the SmarTransfer button.
Figure 24: New Email Send Options

The SmarTransfer window appears:
Figure 25: SmarTransfer Safe Space Folders

Tip: If you do not see the Safe Space folders, click the Home button.
Inserting an Attachment From the SmarTransfer Window
The files in Safe-T SDE are not stored in your local computer. They are in the Safe-T SDE server until you access them.
Note: You can attach files using either Insert File/Folder or SmarTransfer in each email you send but not both. To send file attachments from your local computer and from Safe-T SDE you need to send separate emails.
To insert a file from SmarTransfer as an email attachment
- Double-click a Safe Space that contains a file you want to insert as an email attachment.
Figure 26: SmarTransfer Safe Space Files
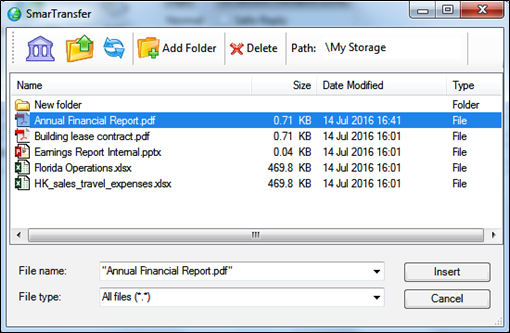
- Select the file you want to attach and click Insert. A window similar to this appears:
Figure 27: SmarTransfer File Attachment

Info: When you insert a file attachment from SmarTransfer, in your email attachments window you will see a link to the file in your Safe Space, not the actual file.
Other Tasks You Can Perform In The SmarTransfer Window
SmarTransfer hosts Space Spaces that are folders and files managed by the Safe-T SDE server. In addition to inserting file attachments into an email you can do the following:
Table 6: The SmarTransfer Ribbon Interface.

Package Receipt
When you send a secure email, you have the ability to gain a lot of information about it. One source of details is in the package delivery receipt. After the recipient logs into the secure access portal and downloads attachments, you are sent a package delivery receipt.
For example:
Figure 29: Package Delivery Receipt

The delivery receipt provides these details:
• Package ID
• Subject of the Email
• Date sent
• Date access to download the file attachments expires
• Maximum number of times the attachments can be downloaded
• Number of times the package was accessed
• Authentication method
Sent Items Menu
You can access another source of details about the emails and attachments you send by accessing the Sent Items [Safe-T SDE] link on the Outlook client navigation pane.
Figure 30: Sent Items Link

Click Sent Items [Safe-T SDE] and a Package Details window appears.
Figure 31: Package Details

The Package Details window displays these details:
• Name of the sender and recipient.
• Number of recipients to which the email was sent.
• Date and time the email was sent.
• Size of the file attachments in KB.
• The IP address of the email sender.
• Package Settings.
• View OTP.
Package Properties
In Package Properties you can add, replace, and delete file attachments. You can perform these modifications even after the file attachments have been accessed by the email recipient.
Click the Package Settings link then click Package Update to open the Package Properties window.
Figure 32: Package Properties

To add file attachments to the package:
- Click Safe Upload.
- Browse to a file or files you want to add.
- Select the files and click Open.
The files are added to the email package.
<Note: After you add new files to the email package, if the email recipient clicks the Secure Content link and authenticates again using the verification code, the file attachments for the package will display the new files you added.
To delete file attachments from the package:
- Click the file or files you want to delete.
- Click Delete.
The files are deleted from the email package.
To download file attachments from the package:
- Click the file or files you want to download.
- Browse to a location on your local computer.
- Click Save.
The files are saved on your local computer.
To share file attachments from the package:
- Click the file or files you want to share.
- Click Safe Share.
A new email window opens with the file or files you selected attached to the email as an attachment.
Viewing the Email Recipient’s Verification Code
Occasionally, an email recipient may have trouble using the verification code sent to them to authenticate at the download package web page.
Info: If enabled by your system administrator, in the Package Details window there will be a View OTP link:
- Click the View OTP link and a message box appears displaying the recipient’s verification code.
Figure 33: View Recipient’s OTP

- Click OK to close the window.