
Admin Quick Start Guide - Secure Data Exchange (SDE)
Quick Start Guide for the System Administrator
Welcome to Safe-T SDE, this tutorial will walk you trough the first steps we recommend to learn and practice for managing SDE in your organization.
- What is SDE?
You will cover all of the Admin Web Portal categories and sections in a glance to create a demo instance of what organization need in order to have a functioning SDE environment using all of the key functionalities SDE server has to offer.
After this tutorial you will be able to configure your own custom settings according to your organization policies.
Tutorial Path
- Part 1 Sign in as Admin
- Part 2 The Web Portal
- Part 3 Create Safe Spaces
- Part 4 Create Policy
- Part 5 Groups
- Part 6 Audit
- Part 7 Reports
- Part 8 Roles
- Part 9 Settings
- Part 10 Summary and Next Steps
Part 1 Sign in as Admin
The first step after purchasing Safe-T SDE subscription license is to open the Email inbox of the selected SDE account administrator
In the email body, there is a link for the Admin web portal along with the temporary username and password(we recommend changing immediately at first login Click Here for a how-to guide).

- Open Web Portal attached link and Log in with the temporary username and password.
- If you failed to receive the temporary username and password please contact SDE support team at
support@safe-t.io
To Next Chapter ▶️ | | Tutorial Path 🔼
Part 2 The Web Portal
In the SDE web portal you will see the welcome screen, the Dashboard where you can monitor the instance of the SDE server at a glance.
Note: This chapter does not require any action
- More about web portal can be found in this document Click Here

The web portal has navigation panel containing this categories:
- Dashboard - Monitor the organization instances in a glance
- Safe Spaces - Create and Manage SDE Safe Spaces (Vault) and Configure permissions Click Here for more information.
- Policies - Configure and manage security policies at the user level Click Here for more information.
- Groups - Create and manage a collection of users who share a single Safe-T SDE policy and have permission to access specified Safe Spaces Click Here for more information.
- Audit - feature enables you to view a table of recent actions (i.e. events) in your SDE server Click Here for more information.
- Reports - view and export Safe-T SDE Server events by configuring a set of filters. Click Here for more information.
- Roles - Edit and Configure Roles Click Here for more information.
- Settings - View or Issue new and Edit Licenses Click Here for more information.
- Help - Information about your SDE server
To Next Chapter ▶️ | | Tutorial Path 🔼
Part 3 Create Safe Spaces
In this chapter you will create a Safe Space for your organization.
- Click the
Safe Spacesbutton on the left navigation panel to view the Safe Spaces administrative work ground.
- Click on
New Safe Spacebutton
In the General section
- Fill in your new Safe Space Name
- Add Description for the Safe Space (optional)
- Select
File Storage - Standard mode(commonly used) - Make sure you select
Visibleoption to enable the appearance of the Safe Space in the web portal
In the Connection Section
- Select the
Typeof the Safe Space conntection (i.e Local Drive) - Fill or Verify the required connection
Path(i.e C:\SafeSpace%UserName%\MyStorage) - *Select
Enable Credentialsif you want to change the default username and password for the safe place. - Click on
Test Connectionto verify the connection to the safe folder path
- If connection test succeeded, go ahead and Click
nextbutton
In Security Section
- Choose
Default Group Policy(you can choose different or create Policy later) - In
Assigned Groups / Usersyou can choose users and groups and edit their permissions

In Identity Section
- Copy and Save the UFID code you generated
In Advanced Section
- Make sure
Allow the Disk Quota Service to delete files on this Safe Spaceis Marked
In Permissions Section
- you can Edit permissions
- when you are done editing Click
Savebutton and you will be redirected to the main Safe Space screen and be able to see the Safe Space you have just created, - By now you Successfully logged in as Admin and Created your first Safe Space, Good Work✔️
- Please continue to Policies Chapter
To Next Chapter ▶️ | | Tutorial Path 🔼
Part 4 Create Policy

In this chapter you will create a new policy for your organization

• Click on New Policy
In General Section
• Give your policy a Name and Description

• Click Next and continue to Permissions stage

In Permissions Section

• On the first column to the left select Access Control, then select OTP section and enable the Enforce OTP option and verify that the Token Delivery Method is Via Email and the recipient will need to use OTP to view the Email content for every Email message sent from your organization

• Next, click on CompanyInfo section, then fill in your company support email address

• Click on Next button and continue to File Types stage

In File Types Section

• If your organization restrict the usage of specific file types here you can mark them to prevent their access.
• When you are done, click on Save button

• A success message will appear in your page header

Note: Policies have many possibilities depending on your organization needs. In This Guide you can find more information about policies
• Congratulations, you have just created your first policy in SDE, next chapter you will assign that policy to a new group of users in your organization
To Next Chapter ▶️ | | Tutorial Path 🔼
Part 5 Groups

In this chapter you will create a new group of users, you will also assign a policy to that group

• Click on New Group to start a new group of users in your organization
• Start by give your group a Name and Assign the This is my policy policy you created in the previous chapter

• Click on Add a Safe Space button and add the Safe Space you created in Safe Spaces chapter and the Outlook Email Storage safe space

• Now click on Create Group button to apply the creation of your organization new group
• A success message will appear in your page header

Back In the main Groups page
• Click on the group you have just created

• Click on New User button

• Now you can create users within the group you created, let’s create your first user in the organization.

• When done click on Next button and continue to Details stage
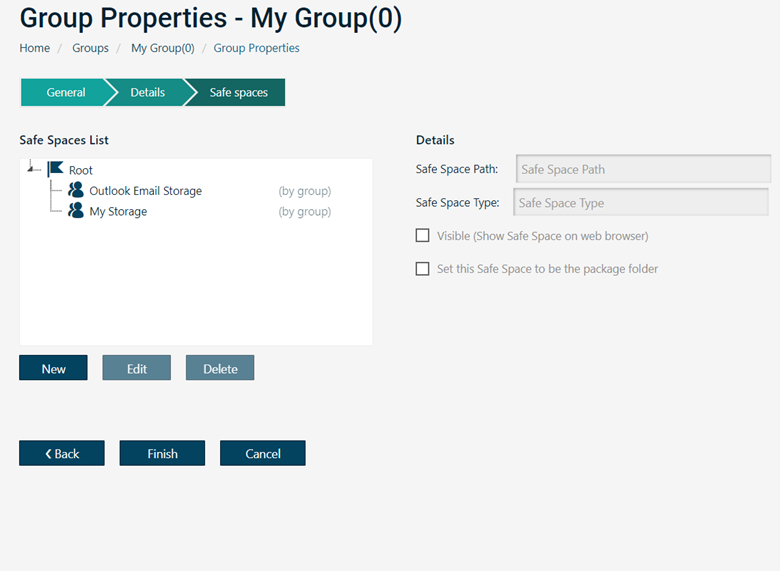
• Apply all the user required details and continue to Safe Spaces stage

• Click on Finish button after verifying the appearance of the safe spaces
• A success message will appear in your page header

Send Registration form to your users group
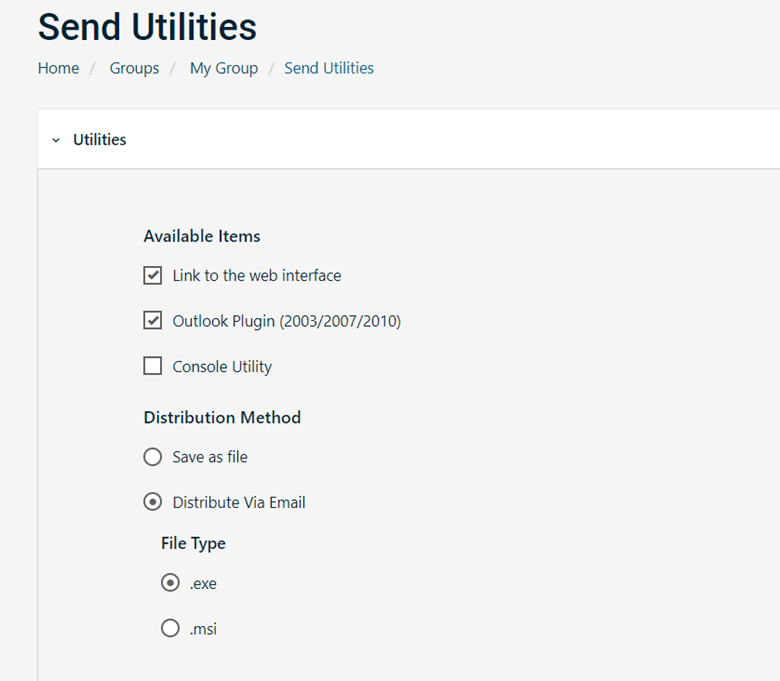
• In the My Group page click on Send Utilities button

• Make sure to select Link to the web interface and also Outlook Plugin (2003/2007/2010) options
• In the Message stage fill in your registration Email details that your user will receive
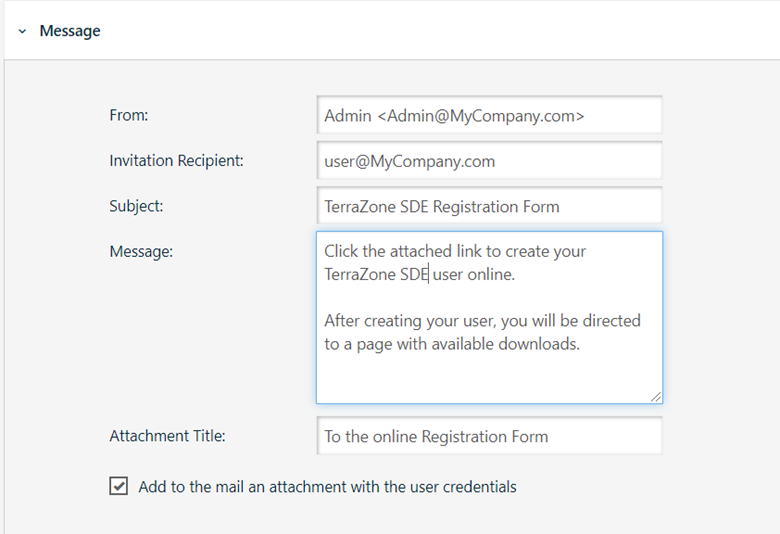
• Click on Send button and your user/users will receive the invitation form to their Email inbox to complete the process of user registration

To Next Chapter ▶️ | | Tutorial Path 🔼
Part 6 Audit

Audit allows you to monitor all actions that occurs in your SDE server
• If needed you can filter action results by time and many other types of searches

• Please continue to Reports chapter
To Next Chapter ▶️ | | Tutorial Path 🔼
Part 7 Reports
Reports allows you to filter by events and export actions by users in your organization

• Please continue to Roles chapter
To Next Chapter ▶️ | | Tutorial Path 🔼
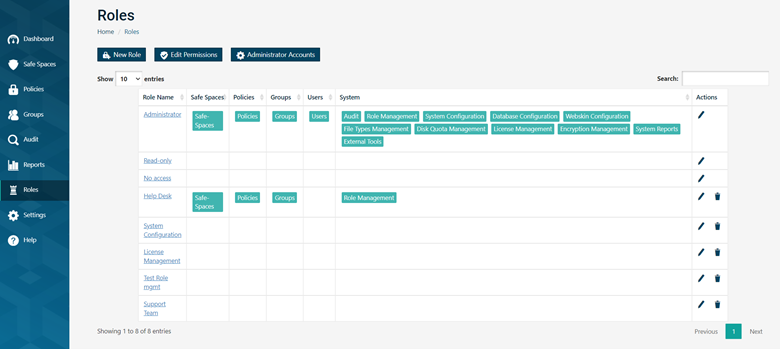
Part 8 Roles

Roles allows you to define and create specific role in your organization when working with SDE
• You can create different level of Admin such as Help Desk or Support by configuring permissions, start by clicking the New Role button, for more information about Roles click here
To Next Chapter ▶️ | | Tutorial Path 🔼
Part 9 Settings

As SDE system administrator you can edit your SDE server configurations in a high level approach from the Settings screen

Part 10 Summary and Next Steps
Congratulations you finished Admin starter tutorial, This is only the tip of the iceberg and a lot remain to be discovered
- How to configure Help Desk Role in SDE system? read here
- How a User in my organization Send secure Email? read here
- How can i dive deeper and advanced my skills as system administrator working with SDE? read here
We at Safe-T hope this guide was helpful and easy to grasp, we would appreciate your review: support@safe-t.io